Hay & Forage Forum banner

NH 66 internals

14K views 50 replies 11 participants last post by  MyDaughtersPony  
#1 ·
This is my first baler so I have a lot of questions. Thanks in advance to those who have and will advise me.

I have included a few pictures of the internals. The wadboard? And plunger? Please elaborate for me. I could not find any other wooden parts other than the one. I'm trying to learn this thing so I'm at least slightly prepared when something breaks.
 

Attachments

#2 ·
Best bet is too see if you can get an owners manual, if no longer available from the dealer then check Ebay, Amazon or Craigslist.

Hate to admit it, but I don't even recognize those parts, oldest I can remember on the farm is a NH273, replaced by a NH276, guess I drove tractor when we had a NH26X something. Dad used to bale with a Oliver 50 then a 60 I guess, or something like that.
 
#3 ·
The wadboard is the serrated one that is obvious. It stuffs the hay into the bale chamber and looks in good condition.

The plunger is the heavy thing like a square piston that slides back and forward in the bale chamber, compressing the hay. There is a wooden slider block along each of its side corners. You can see the end grain of one in the top left of image 3. Their mountings can be adjusted so they are a sliding fit in the chamber. The less it flops around, the better shaped the bales will be. Adjusting the sliders also keeps the plunger knife clearance down (20 thou or so). This, along with keeping the knife sharp, is important for low power consumption and neat square bales.

Roger
 
#5 · (Edited by Moderator)
Pic 1 and pic 2 appear to be the wadboard. (It goes back and forth sideways and is what stuffs the hay in the main bale chamber where the plunger is ). Newer New Holland bales use metal forks in place of the wadboard. The wadboard biggest advantage is that if the baler ever jumps time and the plunger hits it simply breaks the wood as a sacrificial piece. $95 last I checked to buy another from New Holland and you back in business (or you can make one). The disadvantage to the wadboard is that it does not feed as well as the newer feeder fork balers do, but if some of the slighter newer balers ever get the feeder forks hit by the plunger it can junk the entire baler as it wrecks the entire carriage. A whiz bang handyman can rebuild but time and $$$. Wadboard is fine on 8 acres IMOP.

Pic 3 is the plunger (the pluger goes back and forth in line with the tractor and is what forms and compresses the bale. The plunger is metal but it it rides on blocks of wood as simple glide bearings. Newer New Holland balers starting with the model 69S in around 1960 use ball bearing steel rollers (like 13 of them) in place of the wood glide blocks. While the roller bearings are better in some ways, they also cost like $40 each to replace and again there are like 13 of them so costly. When the wood blocks wears there is track adjustment to compensate for the wood wear. When the wood wears to point of no adjustment left you simply replace with new wood blocks. (Many people simply make those blocks but New Holland still sells em too). Do not fret the wood it will last for decades piddling on a measly 8 acres as long as it does not get repeatedly wet and swell. Metal rollers take slightly less hp to run (who cares you have an engine running your baler anyway so you are not sweating limited hp available like you would be say you were powering the baler with that farmall BN and the tractor PTO shaft). Metal ball bearing rollers will hold up to rain better if the baler is stored outside (would be a shame to store that nice baler you have outside though). Combines used wood blocks on the straw walkers for decades simply cause there was nothing better so do not fret it.

Go to messicks website and you can look at all parts diagrams free of charge. (I like messicks because prices are there too, but any New Holland dealer will have the parts diagram available for viewing on their website).

As mentioned in my other post the NH operators manual is worthwhile investment and a must have to own.
 
#6 · (Edited by Moderator)
I'm just trying to go though this before second cutting. Grease all the zerks and make sure nothing needs to be adjusted... Or replaced because it's worn. My dad has the manual so I should probably get that from him.
 
#7 ·
First check whether the plunger knife is already sharp, in which case it does not need sharpening. Also check the cut sides of the bales. Does the cut look neat and clean? Look up the manual to learn how to sharpen it. Failing that, you might be able to get a file or stone onto it in place. Otherwise, unbolt it and sharpen it properly.

Also look at the cut ends of the twines. Are those cuts clean? If not, you need to sharpen the twine knife. (Or does a 66 have replaceable twine knives? I doubt it but you never know.)

Roger
 
#9 ·
I haven't gotten the manual yet. I'm trying to find the knife that cuts the bales. I want to check its condition but can't see to find it. I think I found the knifes that cut the twine. They are current shut... How do I open then?
 
#10 ·
The knives that cut the twines are on a pair of half round plates that sit flat under the knotters. They are driven by a crank to swing around to cut the twine during the knotter cycle. I don't know NH knotters very well so cannot advise you further.

To find the plunger knife that cuts the hay, look through the pickup, past the wadboard, into the gap in the bale chamber where the wadboard stuffs the hay. Turn the baler over until you can see the corner of the plunger appear from the front (or the back). Stop when the back of the plunger is about halfway along the gap. The knife is mounted to the back corner of the plunger. It goes all the way up the edge of the plunger, and shears against a stationary plate at the back of the gap. You will be able to feel it.

Roger
 
#11 · (Edited by Moderator)
I have 1 bale in the chamber. It appears to be tied off completely. I'd like to clear it out so it might be easier for me to check things out and look around. Any way aside from pulling it out to remove it? It's in the chute pretty tight
 
#12 ·
I doubt you will be able to remove it whole. Bale chambers are designed to retard the progress of hay becasue that is what creates bale density. Even removing all the spring tension is not enough, because there are wedges in the chamber. The easiest thing to do is to cut the strings and pull it out slice by slice. You are best not to leave it in the chamber anyway because it will not hold its shape and it will rust the chamber. Keep the slices to one side and rebale them come second cut time if you want.

I have never been able to pull out a bale with less than half a bale left in the chamber. Your 40-bale crop will barely be enough to shine up the inside of the bale chamber.

Roger
 
#13 ·
Thanks for the advice. I'll go out today and get that sucker out of there.

As for our previous conversation about the knife. I guess I assumed the cutting motion was from top to bottom. I can't picture how the plunger cuts the bales... Seems like the direction the plunger is pushing is parallel not perpendicular to the ends of the bale.
 
#14 ·
Thanks for the advice. I'll go out today and get that sucker out of there.

As for our previous conversation about the knife. I guess I assumed the cutting motion was from top to bottom. I can't picture how the plunger cuts the bales... Seems like the direction the plunger is pushing is parallel not perpendicular to the ends of the bale.
The plunger knife cuts the hay as it enters the chamber, thus giving you individual flakes of hay instead of an accordion bale. There is no cutting action needed to cut one bale from the next (aside from that action which separates the flakes). If you look in, it'll soon become much clearer to you.
 
#16 ·
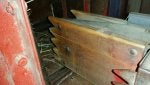
Ah, now I see what is confusing you. The plunger knife does not separate the bales, it separates the hay in the bale chamber and about to be compressed from the hay that has not yet been stuffed into the bale chamber by the wadboard. The bale is made up of a series of about 15 slices, each one made by the rearward push of the plunger.

Standing at the back of the baler looking forward, the right had side of each bale will be cut by the plunger knife, one cut per slice. You can see the cuts on the side of the bales. The knife sits vertically on the rear right edge of the plunger, facing the rear. The shear plate is also vertical, on the rear edge of the feed opening.

On the left side of the bales the hay is tucked into itself.

When you cut open a bale it separates into the slices. A modern baler might make a good bale with fewer slices, but yours will likely need more slices, hence my suggestion of 15. When the knotters are tripped, the twine needles that sit under the bale chamber are pulled through the chamber to carry the twine up to the knotters to be tied. They are protected from the compressed hay by slots in the face of the plunger while it is compressing the hay. All this happens in a fraction of a second. The needles lay the string for the front of the old bale on their way up and the string for the rear of the new bale on their way down.

Roger
 
#18 · (Edited by Moderator)

Start the video at 6 min 15 sec

This is a video for a NH Super 66 which seems pretty similar to mine. So what I am trying to figure out is how the plunger moving forward/backward is making side to side cuts to separate the flakes. In my mind the plunger is not moving in the proper direction. I keep thinking the feeder/wadboard arms side to side motion would be making the cuts???
 
#19 · (Edited by Moderator)
The knives aren't really separating the flakes. As bool said, the knives are cutting the hay as it flows from the pickup to the chamber. This way you aren't just packing your windrow in to one infinitely long bale. The flake is formed by the plunger stroke and at the same time the plunger knife is cutting the hay, dividing hay in the pickup from the hay in the chamber.

It might help if you take a bale and cut it open and examine the cut and fold as you compare it to the baler itself and/or the video.
 
#20 · (Edited by Moderator)
I have opened many square bales and know how they separate. I guess I'll have to go out and mess with it until I can comprehend the process. It just doesn't make sense to me how an arm (plunger) moving forward and backward can make a side to side cut. The bale is being compressed by the plunger down the chute. I can't figure out in my brain how that could slice or cut the bale. I'm definitely not arguing or saying you are wrong... just trying to make it make sense. I really do appreciate all your help.
 
#21 ·
It just doesn't make sense to me how an arm (plunger) moving forward and backward can make a side to side cut.
There is not 'side to side' cut that I am a were of, as HiTech mentioned, most of us call them 'flakes' or slabs of hay (straw, what ever is being baled). Each flake is not cut side to side, all that it is the amount of hay that is stuffed (pushed) it by your wooden board (on newer baler, there are forks that do this generally). You need to think of each flake as a piece of continuous paper, the plunger cuts the paper at each stroke, the paper is a flake and not cut side to side.

Larry
 
#23 ·
Think of the knife as a pair of scissors at the entrance to the chamber. But instead of a point of rotation, one side is connected to the plunger. And instead of a progressive cut like scissors (cutting as the blades move closer but cutting small amounts over the length of the blade) the knife cuts the whole chamber height at once as the plunger strokes. More like a metal shear if you would
 
#24 ·
The plunger packs in a wad of hay (a flake), another, another, etc until the knotters are tripped. at that point the strings come up and tie those flakes together in a complete bale separate from anything else. When the needle come back down they leave twine in the knotters that contains the next bale as it is formed. The knives separate the hay that has been shoved into the bale chamber ahead of the plunger and what is still in the feeder house.